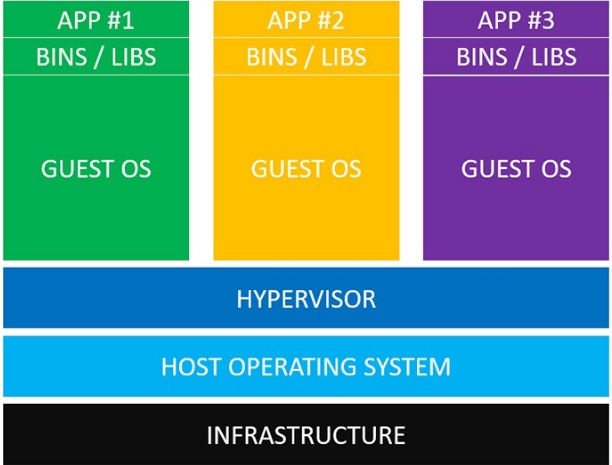
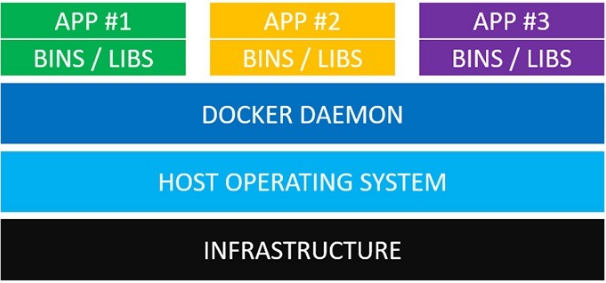
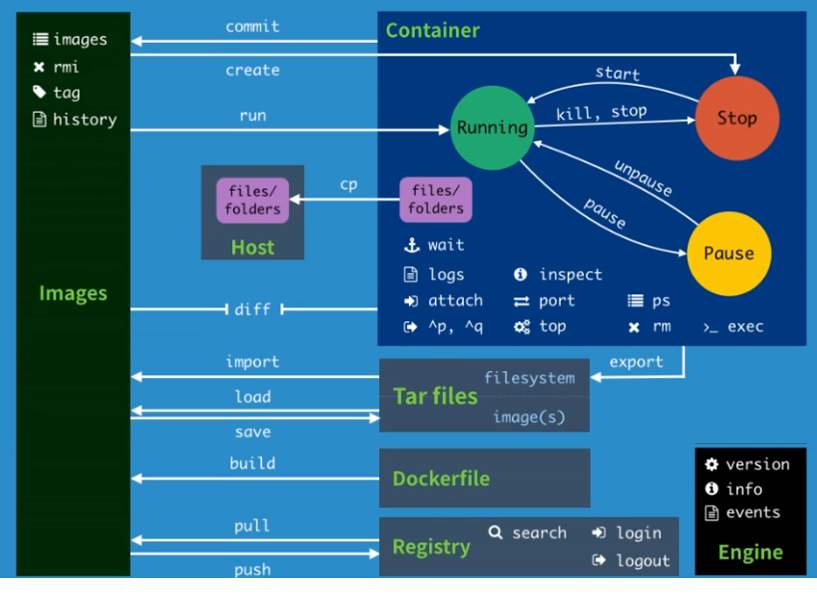
Docker 让开发者可以打包他们的应用以及依赖包到一个可移植的容器中,然后发布到任何流行的 Linux 机器上,Docker是一个开源的应用容器引擎,基于Go语言,并遵从Apache2.0协议开源.容器是完全使用沙箱机制,相互之间不会有任何接口(类似iPhone的 app),更重要的是容器性能开销极低.[来源网络]
#查看安装的docker版本(无错则安装成功) $ docker --version Docker version 19.03.13, build 4484c46d9d
#运行hello-wolrd实例(该命令运行时会从镜像仓库中拉取docker镜像) $ sudo docker run hello-world latest: Pulling from library/hello-world 9bb5a5d4561a: Pull complete Digest: sha256:f5233545e43561214ca4891fd1157e1c3c563316ed8e237750d59bde73361e77 Status: Downloaded newer image for hello-world:latest
Hello from Docker! This message shows that your installation appears to be working correctly. ....
#查看已有的镜像 $ sudo docker images REPOSITORY TAG IMAGE ID CREATED SIZE hello-world latest e38bc07ac18e 2 months ago 1.85 kB #hello-world即从镜像仓库中拉取的镜像 docker run hello-world:latest 启动容器
#查看已有的镜像 $ sudo docker images REPOSITORY TAG IMAGE ID CREATED SIZE hello-world latest e38bc07ac18e 2 months ago 1.85 kB
--all , -a Show all images (default hides intermediate images) --digests Show digests --filter , -f Filter output based on conditions provided --format Pretty-print images using a Go template --no-trunc Don’t truncate output --quiet , -q Only show numeric IDs
#搜索镜像 $ sudo docker search mysql NAME DESCRIPTION STARS OFFICIAL AUTOMATED mysql MySQL is a widely used, open-source relation… 10202 [OK] mariadb MariaDB is a community-developed fork of MyS… 3753 [OK] mysql/mysql-server Optimized MySQL Server Docker images. Create… 744 [OK]
#查看容器日志 $ sudo docker logs [OPTIONS] CONTAINER --details Show extra details provided to logs --follow , -f Follow log output --since Show logs since timestamp (e.g. 2013-01-02T13:23:37) or relative (e.g. 42m for 42 minutes) --tail all Number of lines to show from the end of the logs --timestamps , -t Show timestamps #--------------------------------------------------------------#
#查看容器进程信息 $ sudo docker top CONTAINER [ps OPTIONS] #--------------------------------------------------------------#
$ ip addr 3: docker0: <NO-CARRIER,BROADCAST,MULTICAST,UP> mtu 1500 qdisc noqueue state DOWN group default link/ether 02:42:12:01:fd:bc brd ff:ff:ff:ff:ff:ff inet 172.17.0.1/16 brd 172.17.255.255 scope global docker0 valid_lft forever preferred_lft forever
#查看容器内部ip地址 $ sudo docker exec -it 容器id ip addr 1: lo: <LOOPBACK,UP,LOWER_UP> mtu 65536 qdisc noqueue state UNKNOWN group default qlen 1000 link/loopback 00:00:00:00:00:00 brd 00:00:00:00:00:00 inet 127.0.0.1/8 scope host lo valid_lft forever preferred_lft forever 4: eth0@if5: <BROADCAST,MULTICAST,UP,LOWER_UP> mtu 1500 qdisc noqueue state UP group default link/ether 02:42:ac:11:00:02 brd ff:ff:ff:ff:ff:ff link-netnsid 0 inet 172.17.0.2/16 brd 172.17.255.255 scope global eth0 valid_lft forever preferred_lft forever
#查看docker网络 $ sudo docker network ls NETWORK ID NAME DRIVER SCOPE 3b234a9aa88b bridge bridge local d07463d88601 host host local 5c0b56f3d183 none null local
#自定义网络 $ sudo docker network create --driver bridge --subnet 192.168.0.0/16 --gateway 192.168.0.1 mynet $ sudo docker network ls NETWORK ID NAME DRIVER SCOPE 3b234a9aa88b bridge bridge local 0217c6ae906e mynet bridge local $ sudo docker run -it -d --name mynet-os --net mynet centos $ sudo docker exec -it d9d07c8f46cf ip addr 1: lo: <LOOPBACK,UP,LOWER_UP> mtu 65536 qdisc noqueue state UNKNOWN group default qlen 1000 link/loopback 00:00:00:00:00:00 brd 00:00:00:00:00:00 inet 127.0.0.1/8 scope host lo valid_lft forever preferred_lft forever 7: eth0@if8: <BROADCAST,MULTICAST,UP,LOWER_UP> mtu 1500 qdisc noqueue state UP group default link/ether 02:42:c0:a8:00:02 brd ff:ff:ff:ff:ff:ff link-netnsid 0 inet 192.168.0.2/16 brd 192.168.255.255 scope global eth0 valid_lft forever preferred_lft forever
#自定义网络可通过容器名ping通网络 $ sudo docker run -it -d --name mynet-os02 --net mynet centos sudo docker exec -it mynet-os ping mynet-os02 PING mynet-os02 (192.168.0.3) 56(84) bytes of data. 64 bytes from mynet-os02.mynet (192.168.0.3): icmp_seq=1 ttl=64 time=0.064 ms 64 bytes from mynet-os02.mynet (192.168.0.3): icmp_seq=2 ttl=64 time=0.072 ms 64 bytes from mynet-os02.mynet (192.168.0.3): icmp_seq=3 ttl=64 time=0.072 ms 64 bytes from mynet-os02.mynet (192.168.0.3): icmp_seq=4 ttl=64 time=0.072 ms
#容器连到其它子网 docker network connect [OPTIONS] NETWORK CONTAINER --alias Add network-scoped aliasfor the container --driver-opt driver options for the network --ip IPv4 address (e.g., 172.30.100.104) --ip6 IPv6 address (e.g., 2001:db8::33) --link Add link to another container --link-local-ip Add a link-local address for the container
$ sudo docker ps -a CONTAINER ID IMAGE COMMAND CREATED STATUS PORTS NAMES 518839a304cc centos "/bin/bash" 9 minutes ago Up 9 minutes mynet-os02 d9d07c8f46cf centos "/bin/bash" 11 minutes ago Up 11 minutes mynet-os d32dd57bf19e centos "/bin/bash" 47 minutes ago Up 47 minutes interesting_davinci
$ sudo docker network connect mynet interesting_davinci $ sudo docker exec -it mynet-os ping interesting_davinci 1: lo: <LOOPBACK,UP,LOWER_UP> mtu 65536 qdisc noqueue state UNKNOWN group default qlen 1000 link/loopback 00:00:00:00:00:00 brd 00:00:00:00:00:00 inet 127.0.0.1/8 scope host lo valid_lft forever preferred_lft forever 4: eth0@if5: <BROADCAST,MULTICAST,UP,LOWER_UP> mtu 1500 qdisc noqueue state UP group default link/ether 02:42:ac:11:00:02 brd ff:ff:ff:ff:ff:ff link-netnsid 0 inet 172.17.0.2/16 brd 172.17.255.255 scope global eth0 valid_lft forever preferred_lft forever 11: eth1@if12: <BROADCAST,MULTICAST,UP,LOWER_UP> mtu 1500 qdisc noqueue state UP group default link/ether 02:42:c0:a8:00:04 brd ff:ff:ff:ff:ff:ff link-netnsid 0 inet 192.168.0.4/16 brd 192.168.255.255 scope global eth1 valid_lft forever preferred_lft forever
Compose is a tool for defining and running multi-container Docker applications. With Compose, you use a YAML file to configure your application’s services. Then, with a single command, you create and start all the services from your configuration.
Using Compose is basically a three-step process:
1.Define your app’s environment with a Dockerfile so it can be reproduced anywhere.
2.Define the services that make up your app in docker-compose.yml so they can be run together in an isolated environment.
3.Run docker-compose up and Compose starts and runs your entire app
Successfully built 83683540551f Successfully tagged composeset_web:latest WARNING: Image for service web was built because it did not already exist. To rebuild this image you must use `docker-compose build` or `docker-compose up --build`. Pulling redis (redis:alpine)... alpine: Pulling from library/redis 188c0c94c7c5: Already exists fb6015f7c791: Pull complete f8890a096979: Pull complete cd6e0c12d5bc: Pull complete 67b3665cee45: Pull complete 0705890dd1f7: Pull complete Digest: sha256:b0e84b6b92149194d99953e44f7d1fa1f470a769529bb05b4164eae60d8aea6c Status: Downloaded newer image for redis:alpine Creating composeset_web_1 ... done Creating composeset_redis_1 ... done Attaching to composeset_redis_1, composeset_web_1 redis_1 | 1:C 27 Nov 2020 02:56:41.453 # oO0OoO0OoO0Oo Redis is starting oO0OoO0OoO0Oo redis_1 | 1:C 27 Nov 2020 02:56:41.453 # Redis version=6.0.9, bits=64, commit=00000000, modified=0, pid=1, just started redis_1 | 1:C 27 Nov 2020 02:56:41.453 # Warning: no config file specified, using the default config. In order to specify a config file use redis-server /path/to/redis.conf redis_1 | 1:M 27 Nov 2020 02:56:41.454 * Running mode=standalone, port=6379. redis_1 | 1:M 27 Nov 2020 02:56:41.454 # Server initialized redis_1 | 1:M 27 Nov 2020 02:56:41.454 # WARNING overcommit_memory is set to 0! Background save may fail under low memory condition. To fix this issue add 'vm.overcommit_memory = 1' to /etc/sysctl.conf and then reboot or run the command 'sysctl vm.overcommit_memory=1' for this to take effect. redis_1 | 1:M 27 Nov 2020 02:56:41.455 * Ready to accept connections web_1 | * Serving Flask app "app.py" web_1 | * Environment: production web_1 | WARNING: This is a development server. Do not use it in a production deployment. web_1 | Use a production WSGI server instead. web_1 | * Debug mode: off web_1 | * Running on http://0.0.0.0:5000/ (Press CTRL+C to quit)
$ curl localhost:5000 Hello World! I have been seen 1 times.
Commands: ca Display and rotate the root CA init Initialize a swarm join Join a swarm as a node and/or manager join-token Manage join tokens leave Leave the swarm unlock Unlock swarm unlock-key Manage the unlock key update Update the swarm
#192.168.144.140:服务器ip地址 $ sudo docker swarm init --advertise-addr 192.168.144.140 Swarm initialized: current node (27zm7bkz3lwi3o5zkpb3o3yyd) is now a manager.
To add a worker to this swarm, run the following command: #工作节点服务器执行如下命令 docker swarm join --token SWMTKN-1-1zw8g50ugwjyxprtvvlyhw3o3orj2zg2s717e3lc0n5ha80kjg-d6ovnit23xotl9ak27e3dnbgm 192.168.144.140:2377 #管理节点服务器则执行如下命令 To add a manager to this swarm, run 'docker swarm join-token manager' and follow the instructions.
Nginx集群
1 2 3 4
$ sudo docker service create -p 8888:80 --name nginx-cluster nginx
#添加副本
$ sudo docker service update replicas 3 nginx-cluster
$ sudo docker service scale nginx-cluster=3